Are you trying to install a WordPress theme on your website?
Choosing and installing a theme for your WordPress site is the next step after installing (Setting Up) WordPress.
After successful installation of the WordPress theme, you’re able to create and customize your site as you want.
Do you know? A theme plays a significant role in your site. How your site will look mainly depends on the installed theme. These themes change the look and feel of your entire site without any coding knowledge.
You can search thousands of free themes for your site in the WordPress themes directory or install premium paid themes from third-party sites.
In this article, you will learn how to install and activate themes on your WordPress site.
The following guide will show you two different beginner-friendly ways to install a WordPress theme, so you can choose the way that works best for you.
Install a Theme Using the WordPress Admin Themes Directory
If you want to install a free WordPress theme from the WordPress.org themes directory, the easiest and fastest way is to use the built-in theme search functionality in your WordPress admin dashboard.
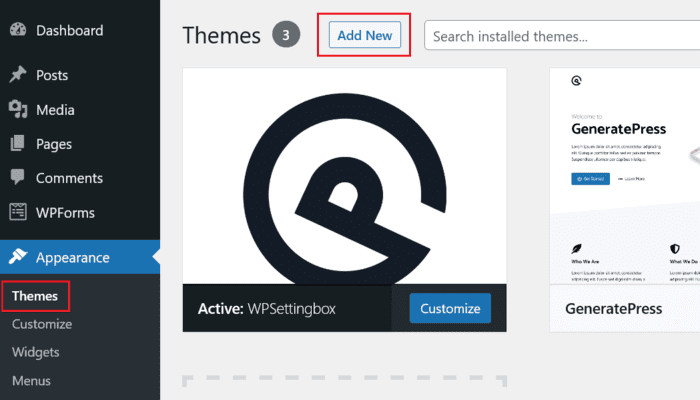
- Log in to your WordPress admin dashboard. Next, go to the Appearance – Themes page and click on the Add New button at the top left.

On the next screen, you will see the theme search toolbar. Where you can find Popular, Latest, and Favorites themes by simply clicking on these options. You can also try the Feature Filter option to find the theme you want that best suits your WordPress site.

Now, when you click on the Feature Filter option. This will allow you to search themes based on features.

You can search your desired themes by the Subject, Features, and Layout. Simply tick on the theme subject, features, and layout options, and now click on Apply Filters button to get your great theme.
According to your search, you will see a complete list of themes.

Now finally, browse through all the themes and decide to choose one among them. Hover your mouse over the theme image. This will reveal the Install, Preview, and Details buttons.
- Go ahead and click on the Install button.
Now, your theme has been successfully installed, and WordPress will show you a success message with an Activate and Live Preview button.
- Finally, click on Activate button, and you have successfully installed and activated your WordPress theme.
Install a Theme Using the Upload Method
In the first method, you learn how to install a theme using the WordPress admin themes directory. But this method only allows you to install free themes that are available in the WordPress.org themes directory.
Now, What? If you’re planning to install a premium WordPress theme from third-party websites like Astra, GP Premium, etc.
So, in this case, you will need to install a theme using the upload method from the WordPress admin dashboard.
- First, download the theme’s .zip file from the third-party website where you purchased it.
- From your WordPress admin dashboard, go to the Appearance – Themes page and click on the Add New button at the top.
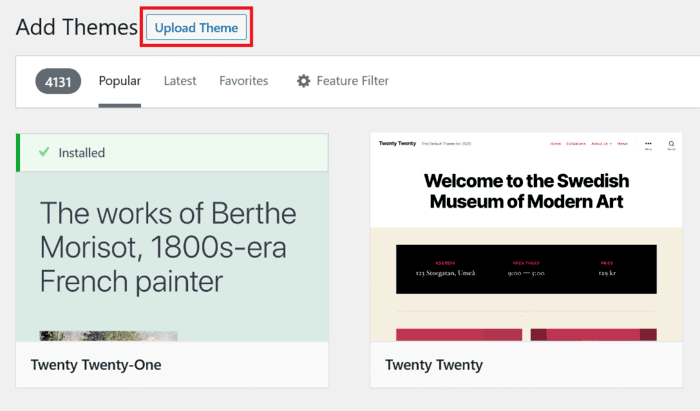
Now, you will see the new theme page with Popular, Latest, and Favorites.

Go ahead and click on the Upload Theme button at the top.

- After that, select the .zip file of the theme from your computer and click on the Install Now button.
Once the theme is installed, click on the Activate link or check Live Preview before activating.
Click on the Activate link, and you have successfully installed and activated your WordPress theme.
I hope this article will help you to install a WordPress theme on your site.
If you liked this article, please show your love by sharing it on your favorite social media channel and also send your thoughts in the comment section.
(Get fresh and updated content from WPSettingbox on Facebook and Twitter.)
I love your comments. It makes me more precise to give you the best WordPress resources and guides.
